Showing posts with label decorations. Show all posts

Tuesday, 12 May 2015

Upcycling a Chair: Trash into Treasure


So I am ALWAYS seeing furniture in the street that has been thrown out or left on the road to be trashed and the possibilities of such things makes me a little excited as well as a bit sad. Excited with all the potential things that can be done and sad because I can't take back EVERYTHING I find or my landlady would go nuts. This chair was actually in the reject zone of my building for about a week and I could not decide- to take or leave? After encountering it about five times I decided it had to come back upstairs with me, where it lived in my room for about a fortnight before I started work on it. In the meantime I visited England for a week and helped decorate a room, and the DIY bug was well rooted in me by the time I returned.


I started out by experimenting with the paints I had lying about seeing how they looked on the wood. As my new room is the bright blue colour I decided that this chair would be a bit boho crazy and opted for using the pink and purple. Once I decided I then gave it a good sanding and wipe over and left to dry.

After I painted the main body in the purple and the wicker back in pink. The wicker was a bit fiddly and took a while, going back and forth etc.


And more painting... I didn't actually do it all in one go as I did bits in between other jobs.


Once I had painted all of what I need to cover on the chair, I neatened the edges of the wicker back using a fine brush.


At this point it looked like this. As you can see I did not paint the seat. This is because I knew it would be covered with fabric and realized that I would be wasting time and paint.

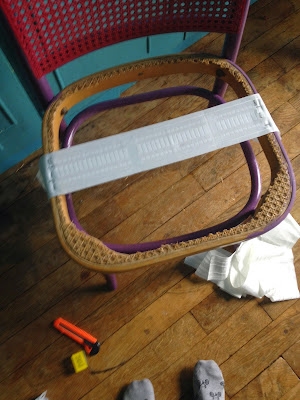
Then the seat got removed....! Just with a craft knife, I hacked it out. And started cutting the tape to size. This "tape" is actually tape use for making curtains because I found it for 2 euro a pack at Ikea and it seemed very strong so I thought why not. And it worked so clearly it was ok. The tape I simply cut to size and stapled in place with a heavy duty staple gun on top of the chair to start with and then on the sides.


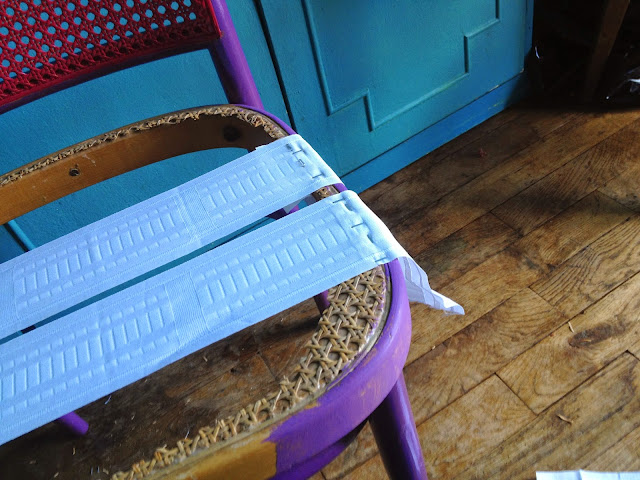
And the next one.


Once I had done all the horizontal ones, I started weaving vertical strips across. This is to make it stronger. And deff make sure you pull taunt on it every time you place a staple. This is very important.


Keep going until you have gone all the way around.


Then neaten and strengthen further by stapling on the sides and underneath, to the inside of the seat. By this point you will have a recognizable chair! I wanted padding on my seat so I did this next bit. But its optional.


I had some leftover stuffing from making a cushion and the outer shell of another cushion which I had used the stuffing from and used this to pad my chair. You could use foam or just sandwich the stuffing between two pieces of fabric, I just used what I had. 

I stapled this in place and trimmed the excess, also pushing the fuzz into the right places as I went (evenly).


I then placed the fabric on the chair to figure out pattern placement and cut it out. Then placed a few staples in the middle of each edge, pulling on it as I went to keep it tight.


The corners were fiddly. I stapled them as you can see, top left then cut the excess off.


Underneath it looked like this. I folded the fabric under and around the leg and went staple crazy. This was just for the front two legs.


For the back two legs I folded the fabric back, and cut the triangle off as you can see below.


I then folded the fabric around the leg and stapled in place. I did this for all the legs, always pulling on the fabric to keep it taut. 


And this is how it looked! But the staples were visible. I was careful to keep them in a straight line near the edge but its still ugly. So I bought 2m of some funky trim and used my glue gun to put it in place. 


Going all the way around, bit by bit.

Et voila!


Finished!


Saturday, 11 April 2015

Gold RImmed Stamped Clay Bowls


I saw this blog over on pinterest for stamped clay bowls and really loved the idea, I also needed to make something for a belated mother's day present for when I head back to the UK in the Easter hols. So I thought this would be perfect. But in my normal haphazard style, mine are of course far from the perfection of Gathering Beauty's bowls. But I still love them and think my mother will too.

WHAT YOU NEED


Air Dry Clay
A Stamp of Some Kind (mine was a clear plastic one but you can use wooden mounted rubber ones too, they can also be any size, you will just need to stamp more).
Ink
Gold Cermamic Paint
Rolling Pin
Knife
Sandpaper
Paintbrush
White Spirit


First of all I made a mount for my stamp because I did not have one of those plastic blocks big enough, and I was trying to do this on the cheap.


You can see it here inked up and ready to go.


Then get a chunk of clay, knead it then roll it out until the desired thickness.

There are two ways of going about the next bit, either you can stamp the rolled out clay, or you can cut it to shape first then stamp it. I found doing it the first way (as the other blog did), meant that I had scraps of clay with ink on it, thus making it more or less useless to use again. So I decided it was better to cut it to size first.


So put a bowl over it that is the desired size and cut around with a knife.


Voila!

Now stamp it. Remember to ink up your stamp thoroughly each time and apply equal pressure.


You will then have a stamped disk, as you can see my ain't perfect (but it is part of the charm!)


Then press it carefully into a bowl. Do this evenly and gradually to avoid distorting the pattern.


Keep going until you use all your clay and all your bowls!

You then need to leave them to dry, I did this before work and by the time I came home (7 hours later in my very warm apartment) they were ready to turn out.


If you look carefully on this one you can see the rim is whiter where it is dry and the rest is still grey. It is not quite ready to be turned out.


This is how they looked when I left them to dry over night.


Once totally dry (about 24hours later) I gave them all a good sanding and evened out the rims as much as I felt like.


See, Much neater.


I then painted all their rims gold.


Some of them however had traces of blue ink on the bottom so I thought I would paint some of the bottoms gold too. Also as I am giving them as presents in sets of two, I thought this would make it more exciting!


Two coats later and I am done.


I am quite happy with how they turned out and will deff do this again. It was good fun and fairly cheap. And I think they look beautiful!

Next time I would like to get another stamp and colour to mix it up a bit. I nearly went with another colour because this is the same as the colour Gathering Beauty used, but its also the colour of my current bed and future bedroom AND my other choices of red or purple would not have been as appreciated by the intended recipients. Choosing another colour purely to be different seemed more daft than using the same! But if it had been just for me I would have done red for sure. 

Here is a pretty song


Wednesday, 17 December 2014

DIY Christmas Decorations Pt. 1

So this is just going to be a short one, Christmas is nearly here and I wanted to give my friends a homemade present they would appreciate. Being that they are all in fairly new apartments (we are all expats in Paris) and that I have very limited finances, I was a bit stuck. And there is the perpetual problem of just because I like it does not mean THEY will... So after much brain wracking and making several things including these tea light holder (below), I settled on tree decorations.


As you can see the one on the left is much more Christmassy than the other, I was toying with ideas... I will do a tutorial of the tea light jars on the weekend as I have a lot of ideas for these (and I have been saving a lot of jars).

Who knows, maybe they would have preferred up-cycled jam jars now candle holders, but these are new friends and maybe I shouldn't experiment TOO much.

So instead I made TONS of these...

Really simple, I bought air dry clay and cut the shapes out using a glass (I am currently sans cookie cutters- this would have opened a whole host of options I simply did not have this time). Once I had the shape I ran my finger around the edges so soften them then got creative. I searched the cupboards for ANYTHING I could use to make imprints on them. I am lucky in that I live with an eccentric French lady who happened to be out at the time.... 

I mostly used the bottoms of crystal dishes and glasses (yes I know what you are thinking...) and the edges of her silverware. The crimpled edges that you can see clearly on the top two in the right picture were as a result of the bottom of a dish, the more ornate patterns were the same section of silverware I simply pressed my decoration into several times (they looked cute on a few blank ones around the edges).

I then made holes with a nail and stamped in the words. As you can see "Christmas" was too long, so I switched to French...! I tried coloured acid free distress inks on my letters, when they dried the colour was gone. My cheap black was deff best.

I did not even paint them! White and black is classic. I waited for them to dry for 24hours, then flipped them.


Once they were dry I added string. Just rustic ordinary string I had, which I love. This is the only one that remains now that I haven't given away for me to show you... Partly because it was a bad one haha.

After I split them up int sets of six or so. However I then saw my roommates tree and saw how glittery it was, so to make hers extra special, I attacked them with glitter:


The Paris ones did not really work, but I thought its squiffiness would make her laugh. In order for the glitter to stay I coated them PVA first, then glittered, then once dry I coated again in glue (this is all before adding the string).


Et voila! I made tags from recycled xmas paper from last year and some festive paper bags I found in a local craft store. I have already given out two packets and they were well received. I was pleased with the results...

Jam jar candle holders next up I think!